Showing posts with label DIY. Show all posts

Friday, May 11, 2012

Because It's Friday - Liven Up Your Garden

Here are some of the most unique and attention grabbing planters that we've come across

Use those out-grown or thrifted rain boots to liven up your garden fence!

Recycling old tires as planters can add interest to your garden and help the environment at the same time!

Vintage colanders make perfect planters with built in drainage! 

With a little imagination old tin cans can become spectacular planters

Add some whimsy to your garden with old furniture

Have these planters ignited your the creative gardener inside you?
Well, if anything we hope we've left you with some  
inspiration for your weekend!


Thursday, May 3, 2012

Dog Treat Jars

Last weekend I pulled out some old ceramic jars that we were no longer using and decided to give them a new purpose..


In the past we used these jars for storing sugar and bread crumbs, but they have been out of commission for a while.  So after a good cleaning and some black paint they are the perfect place for storing Huck's treats and small bones


Considering I free handed these, I'm pretty happy with the final product!


What do you guys think?
Comment below and don't forget to follow us!
We link at these parties!

 Pin It

Sunday, April 29, 2012

Pretty Yellow Frame

I fell in love with the ornate details of this frame, and for only $8 I decided to look past the gold paint that wouldn't match anything in my house, and I bought it.  Now, 2 months later, I realized that I should probably break out the spray paint 
and help this frame reach its full potential!


I spray painted the entire frame yellow, then painted the larger details with a thin layer of white.  Next I sanded a few areas to allow some specks of gold to shine through.


Here's a close up of the details 

I just love it!
Leave a comment below - we love to hear your opinion!

We're linking at these parties!

 Pin It

Tuesday, April 24, 2012

Month-by-Month Onesies

It seems as though baby shower season is in full swing! We've seen countless posts filled with baby shower inspiration lately! 

We've also been busy with baby showers around here! 
Have you seen the adorable Vintage Winnie the Pooh Cookies that Dana did recently for a friends baby shower?

Last weekend we also attended a baby shower for our cousins wife.  We wanted to give her a meaningful and memorable gift so we decided on Month-by-Month Onesies! 

We used the boy version of the
but there are also several other printables available for free online or to buy on Etsy

Petite Lemon offers both a boy and girl color pallet

Martha Stewart offers a neutral color pallet that could work for boys or girls


Once you find (or make if your not Photoshop deficient like me) the perfect pattern you simply print it out on iron on transfer paper, cut it out and iron it on!


This gift was a huge hit with the mommy and all of her guests!

Check back for more goodies from this jungle themed baby shower later this week! 

We're linking at these parties!

 Pin It

Friday, April 6, 2012

Wooden Spring Sign

The winner of the $50 Amazon gift card will be announced tomorrow! 
There's still time to enter so don't miss out! 


Our front door was looking a little drab and it needed something to brighten it up.  I went to the craft store thinking that I would make some kind of wreath, but then I founds these wooden letters and had a different idea!


I cut squares of scrap paper to cover each letter.  I glued the letters to the paper, then used my X-acto knife to cut around the letters.  I sealed the paper on top using modge podge. 


Next I connected each letter using chain and my glue gun.


I added a pretty flower to the top and made a loop with a piece of string to use for hanging.


Here's a closer look at the letters -


Normally I would worry about this getting ruined being outside - but we have a glass storm door so it will be protected from the elements


Do you guys like this alternative to a wreath?


We love to hear what you have to say so please comment below!

We're linking at these great parties!

 Pin It

Wednesday, April 4, 2012

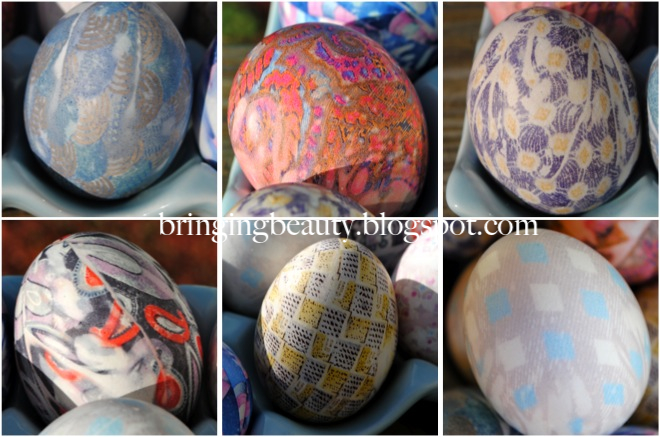
Silk Dyed Eggs


After stumbling across this project on the Martha Stewart website, I was hooked. There are countless different egg dying techniques floating around this year, but this was one that I had to see for myself!

What you need:
  • Uncooked eggs
  • 100% silk ties
  • White cloth 
  • String or twist ties 

You can pretty much use any 100% silk material that you have - ties, scarves, shirts - whatever!


Be sure that the tags say 100% silk!

I bought my ties from the salvation army - but if your lucky you can find some in your husbands closet
(I won't tell!)


Now you have to cut the ties up, leaving a piece of silk big enough to wrap around your egg.


Wrap the egg with the patterned side of the material touching the egg


Next, use a piece of your white cloth to wrap around the silk covered egg.  Tie as tightly as possible with the string or using a twist tie.


Now it's time to boil! Put the eggs into a pot with cold water and 2 tablespoons of vinegar.  Bring to a boil and let cook for at least 20 minutes.


Carefully remove the eggs with tongs and set them aside to cool.  Once they have completely cooled you can take off the cloth to see how they turned out!

 I don't know how this blue tie turned into a grey egg, but I love it!


The texture of this tie really showed up great on the egg!

I love how each egg looks so unique!


The fun part is trying out all different kinds of ties to see what looks the best!

Some of the ties I thought would work the best actually came out funny - while some ties that I overlooked made the best eggs!


Any part of the egg that wasn't being directly touched by the silk will stay white - I kind of like this look but if you want to minimize it be sure to get your silk as smooth as possible before covering with the white fabric.

Don't throw away the fabric scraps when your done - some can be used up to 5 times!


Tell us what you think!! Will you guys give this a try?

Don't forget to link up to Beautify It Monday and enter for your chance to win a $50 Amazon gift card while there's still time!


We're linking at these great parties!

 Pin It
Related Posts Plugin for WordPress, Blogger...